Introduction
House wiring installation is one of the most important parts of building a safe, functional, and energy-efficient home. Every electrical device in a house, from lights and fans to air conditioners and kitchen appliances, depends on a properly designed wiring system. Without correct wiring, electrical equipment may not work efficiently, and the risk of electrical hazards can increase significantly.
For beginners, house wiring may seem complicated because it involves various cables, switches, circuit breakers, sockets, and safety regulations. However, understanding the basics can help homeowners make informed decisions, communicate effectively with electricians, and ensure that their electrical systems meet safety standards.
A properly installed wiring system provides reliable power distribution throughout the house while minimizing the chances of short circuits, electric shocks, and fire hazards. Whether you are constructing a new home, renovating an old property, or simply learning about electrical systems, understanding house wiring installation is extremely valuable.
This comprehensive guide explains everything beginners need to know about house wiring installation. You will learn the importance of wiring, the tools and materials required, the installation process, common mistakes to avoid, and expert tips for achieving a safe and efficient electrical system.
What is House Wiring Installation?
House wiring installation is the process of designing, laying, connecting, and testing electrical cables and components throughout a residential building. The purpose is to safely distribute electricity from the main power supply to different rooms, appliances, and electrical fixtures.
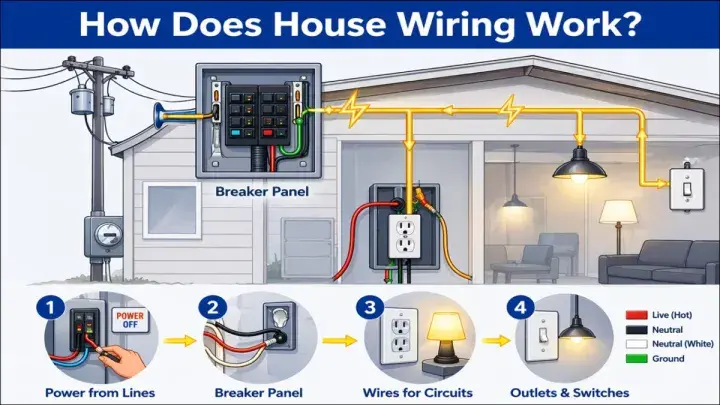
A house wiring system typically consists of electrical cables, switches, sockets, distribution boards, circuit breakers, grounding systems, and lighting fixtures. These components work together to ensure that electricity flows safely and efficiently throughout the home.
The installation process requires careful planning to determine the location of outlets, lighting points, electrical panels, and appliances. Proper wiring ensures that electrical loads are balanced and that safety mechanisms protect occupants from electrical accidents.
Modern house wiring follows electrical codes and standards designed to minimize risks and improve reliability. Whether using concealed wiring inside walls or surface wiring on walls, the goal remains the same: delivering electricity safely to every part of the house.
Why is House Wiring Installation Important?
House wiring installation plays a crucial role in the safety, functionality, and value of a property. A properly installed electrical system ensures that all devices and appliances receive stable power without interruptions or safety concerns.
Poorly designed or outdated wiring can lead to serious problems such as electrical shocks, frequent power outages, equipment damage, and even fires. Therefore, investing in quality wiring installation is essential for both new and existing homes.
Proper wiring also supports future electrical needs. As homeowners add new appliances, smart home devices, and entertainment systems, a well-designed electrical network can accommodate increased power demands efficiently. Additionally, quality wiring improves energy efficiency, reduces maintenance costs, and enhances the overall safety of the household.
Step-by-Step Guide to House Wiring Installation
Step 1: Plan the Electrical Layout
Before starting installation, create a detailed electrical plan. Identify the locations of switches, outlets, lighting fixtures, fans, air conditioners, and major appliances.
Calculate the electrical load for each room to ensure the wiring system can handle future requirements. Proper planning helps avoid costly modifications later.
Step 2: Obtain Necessary Approvals
Many regions require electrical installations to comply with local building codes and regulations. Obtain any required permits before beginning work.
Compliance with regulations ensures the installation meets safety standards and passes inspections.
Step 3: Gather Tools and Materials
Common tools and materials include:
- Electrical wires and cables
- Circuit breakers
- Distribution board
- Switches
- Electrical outlets
- Conduits and fittings
- Screwdrivers
- Wire strippers
- Voltage tester
- Electrical tape
- Cable clips
- Drill machine
- Measuring tape
Using high-quality materials improves durability and safety.
Step 4: Install Electrical Conduits
Conduits protect electrical wires from damage and provide a pathway for cable routing.
For concealed wiring systems, conduits are embedded inside walls before plastering. For surface wiring, conduits are mounted directly on walls and ceilings.
Ensure conduit routes are planned carefully to avoid unnecessary bends and obstacles.
Step 5: Install Distribution Board
The distribution board serves as the central control point for the electrical system.
Install the board in an accessible location. Connect the main power supply, circuit breakers, and protective devices according to electrical standards.
Label each circuit clearly for easy identification and maintenance.
Step 6: Pull Electrical Wires Through Conduits
After conduit installation, pull the appropriate wires through each conduit route.
Common wire color codes include:
- Red or Brown: Live wire
- Black or Blue: Neutral wire
- Green or Green-Yellow: Ground wire
Leave sufficient wire length at connection points for future maintenance.
Step 7: Install Switches and Outlets
Mount electrical boxes securely at designated locations.
Connect wires to switches and outlets according to the electrical plan. Tighten all terminals properly to ensure secure connections and prevent overheating.
Double-check wiring diagrams before finalizing connections.
Step 8: Connect Lighting Fixtures
Install lighting fixtures after completing switch connections.
Connect live, neutral, and ground wires carefully. Ensure fixtures are securely mounted and compatible with the intended electrical load.
Test each fixture individually before completing the installation.
Step 9: Establish Grounding System
Grounding is one of the most critical safety measures in house wiring.
Install grounding rods or grounding electrodes according to local regulations. Connect all grounding conductors securely to the electrical system.
A proper grounding system helps protect occupants from electrical shocks and equipment damage.
Step 10: Perform Testing and Inspection
Before energizing the system, conduct comprehensive testing.
Check for:
- Continuity
- Insulation resistance
- Correct polarity
- Grounding effectiveness
- Circuit breaker operation
Resolve any issues before connecting the electrical supply.
Step 11: Final Power Connection
After successful testing and inspection, connect the system to the main power source.
Turn on each circuit individually and verify proper operation of outlets, switches, and lighting fixtures.
Monitor the system for any unusual signs such as overheating, sparks, or voltage fluctuations.
Benefits of House Wiring Installation
- Provides safe electricity distribution throughout the home
- Supports modern appliances and electronic devices
- Reduces the risk of electrical accidents
- Improves energy efficiency
- Enhances property value
- Enables future electrical expansion
- Ensures compliance with safety regulations
- Minimizes maintenance costs
- Improves overall convenience and comfort
- Supports smart home technology integration
- Provides stable and reliable power supply
- Reduces chances of electrical fires
Disadvantages / Risks
- Installation can be expensive
- Improper wiring may cause electric shocks
- Faulty connections can lead to fire hazards
- Poor planning may require costly modifications
- Substandard materials reduce system lifespan
- Overloaded circuits may damage appliances
- Lack of grounding increases safety risks
- Incorrect wire sizing causes overheating
- DIY installations can violate local regulations
- Hidden wiring faults may be difficult to detect
Common Mistakes to Avoid
One common mistake is using the wrong wire size for electrical loads. Undersized wires can overheat and create serious fire hazards. Always select wire gauges according to the expected current requirements.
Another mistake is overloading circuits with too many appliances. This can trip circuit breakers frequently and reduce system reliability. Proper load calculations should be performed during the planning stage.
Poor grounding practices are also a major issue. Some homeowners overlook grounding to save costs, but this significantly increases the risk of electrical shock and equipment damage.
Loose connections can cause sparks, overheating, and intermittent power problems. Every electrical connection should be tightened securely and inspected thoroughly.
Ignoring electrical codes and safety regulations is another serious mistake. Compliance with local standards ensures safety and prevents legal complications.
Many beginners also fail to label circuits properly. Clear labeling simplifies troubleshooting, maintenance, and future upgrades.
FAQs
1. What is the best wiring method for a house?
Concealed conduit wiring is generally considered the best method because it provides protection, safety, and an attractive appearance. It also reduces the risk of physical damage to electrical cables.
2. How long does house wiring installation take?
The duration depends on the size and complexity of the property. A small house may require a few days, while larger homes can take several weeks to complete.
3. Can I install house wiring myself?
While basic electrical tasks may be manageable, complete house wiring should be performed by qualified electricians. Professional installation ensures safety and compliance with regulations.
4. What type of wire is commonly used in homes?
Copper wiring is the most common choice because it offers excellent conductivity, durability, and reliability. It is widely used for residential electrical installations.
5. How often should house wiring be inspected?
Experts generally recommend a professional inspection every 5 to 10 years. Older homes may require more frequent inspections to identify potential hazards.
6. Why is grounding important in house wiring?
Grounding provides a safe path for fault currents, reducing the risk of electrical shock, equipment damage, and fire hazards. It is a critical component of every electrical system.
7. What causes circuit breakers to trip frequently?
Frequent tripping may result from overloaded circuits, short circuits, faulty appliances, or wiring defects. A qualified electrician should investigate persistent issues.
8. How can I improve electrical safety at home?
Use quality materials, install circuit breakers, maintain proper grounding, avoid overloading outlets, and schedule regular inspections to ensure maximum electrical safety.
Expert Tips & Bonus Points
Always choose high-quality electrical components from reputable manufacturers. Cheap materials may save money initially but often lead to costly repairs and safety issues later.
Plan for future electrical needs when designing the wiring system. Additional outlets, dedicated appliance circuits, and smart home compatibility can prevent expensive upgrades in the future.
Install residual current devices (RCDs) or ground fault protection systems wherever possible. These devices provide an additional layer of protection against electric shocks.
Keep detailed wiring diagrams and documentation after installation. Accurate records make future maintenance and troubleshooting significantly easier.
Use separate circuits for high-power appliances such as air conditioners, water heaters, ovens, and washing machines. Dedicated circuits improve performance and reduce overload risks.
Schedule regular inspections to identify worn insulation, loose connections, and outdated components before they become serious problems.
Conclusion
House wiring installation is the foundation of a safe and efficient electrical system in any home. From powering lights and appliances to supporting modern technology, proper wiring ensures that electricity is distributed reliably throughout the property. Understanding the fundamentals of house wiring helps homeowners make informed decisions and appreciate the importance of quality electrical work.
A successful wiring project begins with careful planning, accurate load calculations, and compliance with safety regulations. The installation process includes designing the layout, installing conduits, routing cables, connecting switches and outlets, establishing grounding systems, and conducting thorough testing before energizing the system. Each step contributes to the overall safety and performance of the electrical network.
While house wiring offers numerous benefits, including improved safety, energy efficiency, and property value, it also carries risks when performed incorrectly. Avoiding common mistakes such as overloaded circuits, poor grounding, and improper wire selection can significantly enhance system reliability. By following best practices and seeking professional assistance when necessary, homeowners can enjoy a dependable electrical system for many years. A well-installed wiring system is not merely a convenience—it is an essential investment in the safety, functionality, and future readiness of every home.